Deploying to a DigitalOcean droplet
DigitalOcean is an amazing cloud hosting provider. They provide SSD-based cloud servers for as little as $5 in different data centers, and you can get your server up and running in a matter of minutes.
Naturally, we think this is a great target for DeployBot deployments — we want deployments to be as easy to get running as possible.
Add your DigitalOcean Personal Access Token to DeployBot
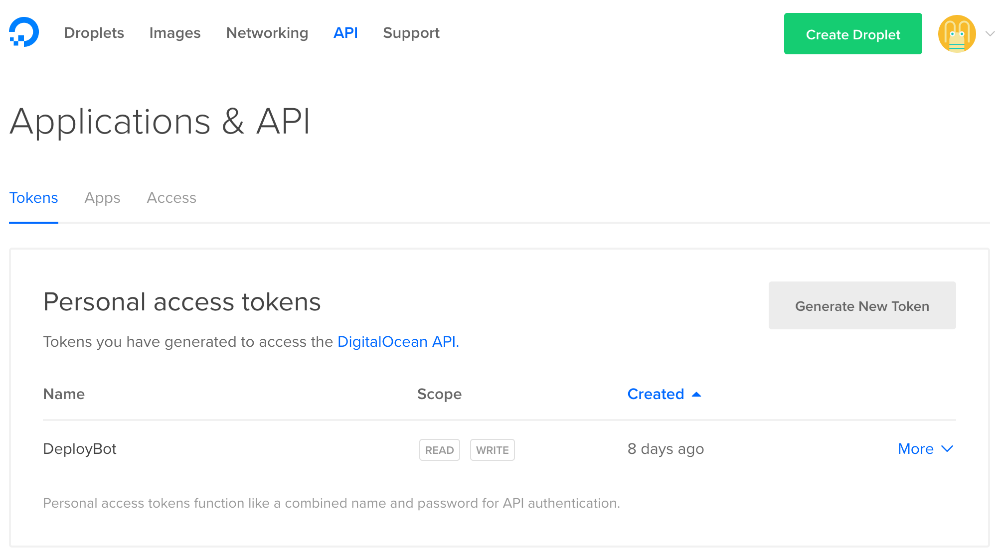
First of all, you need to generate a Personal Access Token on DigitalOcean so you can add this to your DeployBot account. The token can be generated under the API section on your DigitalOcean account. When you generate the token, be sure to select the 'Write' option. For security purposes, the token will be shown one time only, so please copy it. If you forget it or don't copy it down, you can always regenerate the token at a later time.
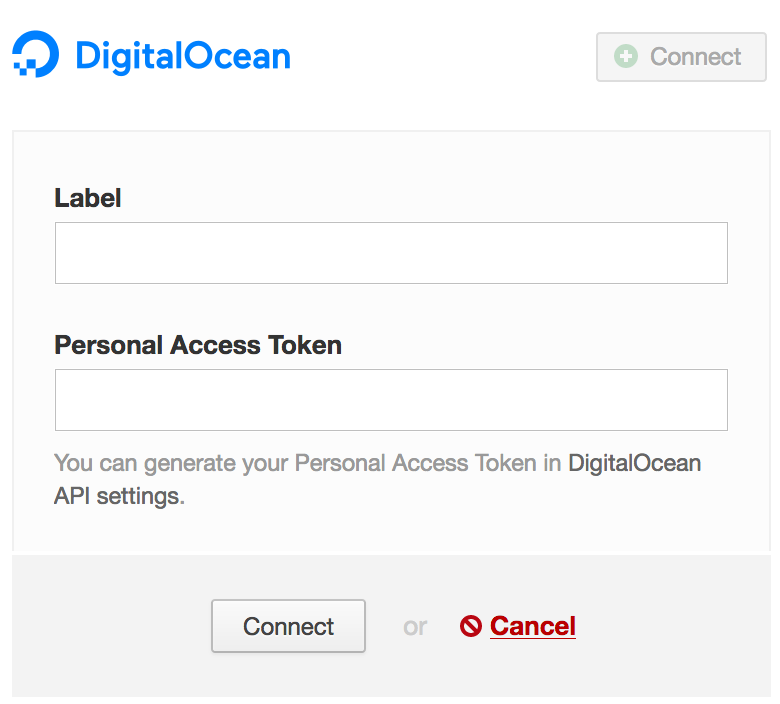
Once you have copied the token, you can add it to DeployBot under the Settings > Integrations page. Click the 'Connect' button, enter a name for your connection in the Label field, and paste the token into the Personal Access Token field.
After connecting your account, DeployBot will be able to add unique SSH keys to DigitalOcean, and when you create new droplets you’ll be able to add that key right away, giving DeployBot access to deploy to those servers. Unfortunately DigitalOcean doesn’t allow adding keys to existing servers, so this needs to be done manually. (We provide the commands to do this on the server settings page.)
Create a server and connect it to your DigitalOcean droplet
Go to your environment settings page and click the 'Add a server' button. You’ll notice there are two DigitalOcean choices. The web applications choice will set up an atomic deployment, and allows you to deploy complex web apps with zero downtime to your droplet. The files (non-atomic) choice is a reliable and secure way to upload files to your droplet using an encrypted connection. It can also be used to deploy web applications that are insensitive to runtime filesystem changes or have relaxed uptime requirements.

Atomic deployment set up
If you chose the atomic deployment, you'll see a screen similar to the one below:
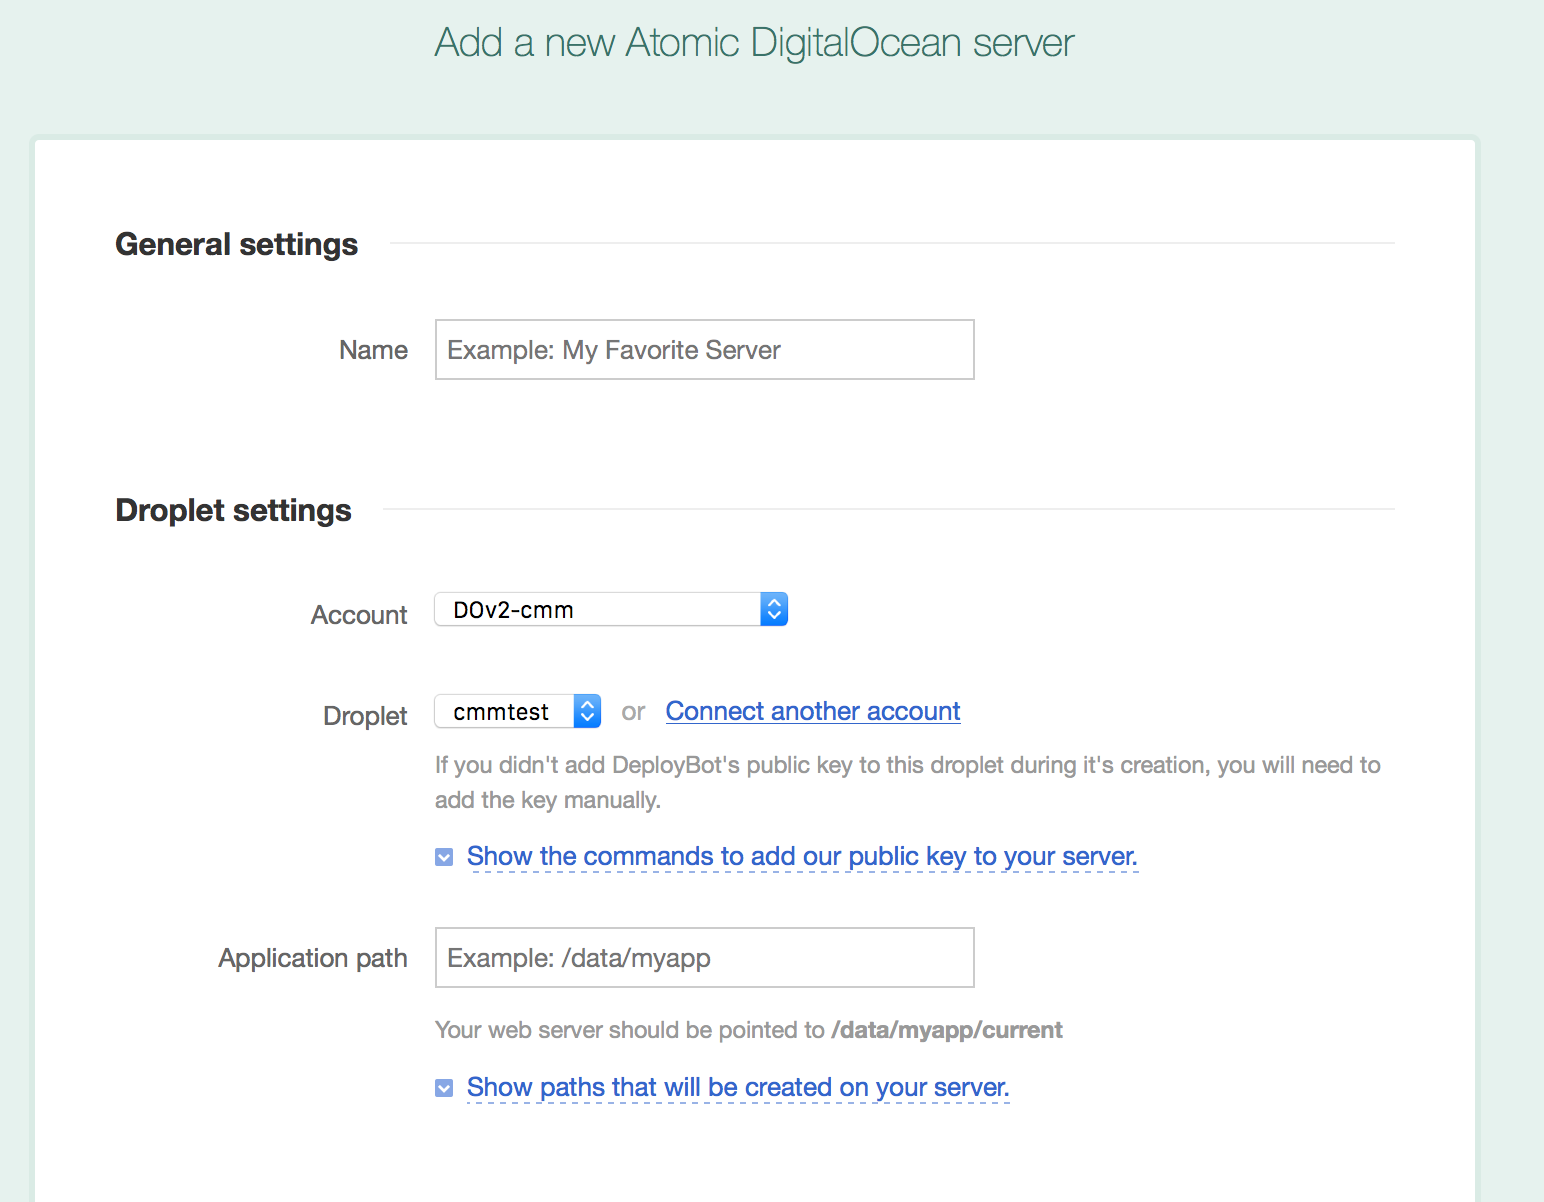
Pick a name for your new server, then select a droplet you want DeployBot to deploy to. The commands to add the DeployBot SSH key to your DigitalOcean droplet are available if you click the “Show the commands to add our public key to your server.” link. If you are using a different deployment user or a non-standard SSH port, you can change these under the Advanced options block at the bottom of the page.
Please note that by default all DigitalOcean droplets are created using only the root user, so DeployBot uses the root user as the default user for the deployment.
In the 'Application path' field, enter the path that DeployBot should deploy your web application to. If you click on the 'Show paths that will be created on your server' link, you will see the various paths that will be created by DeployBot for the atomic deployment:
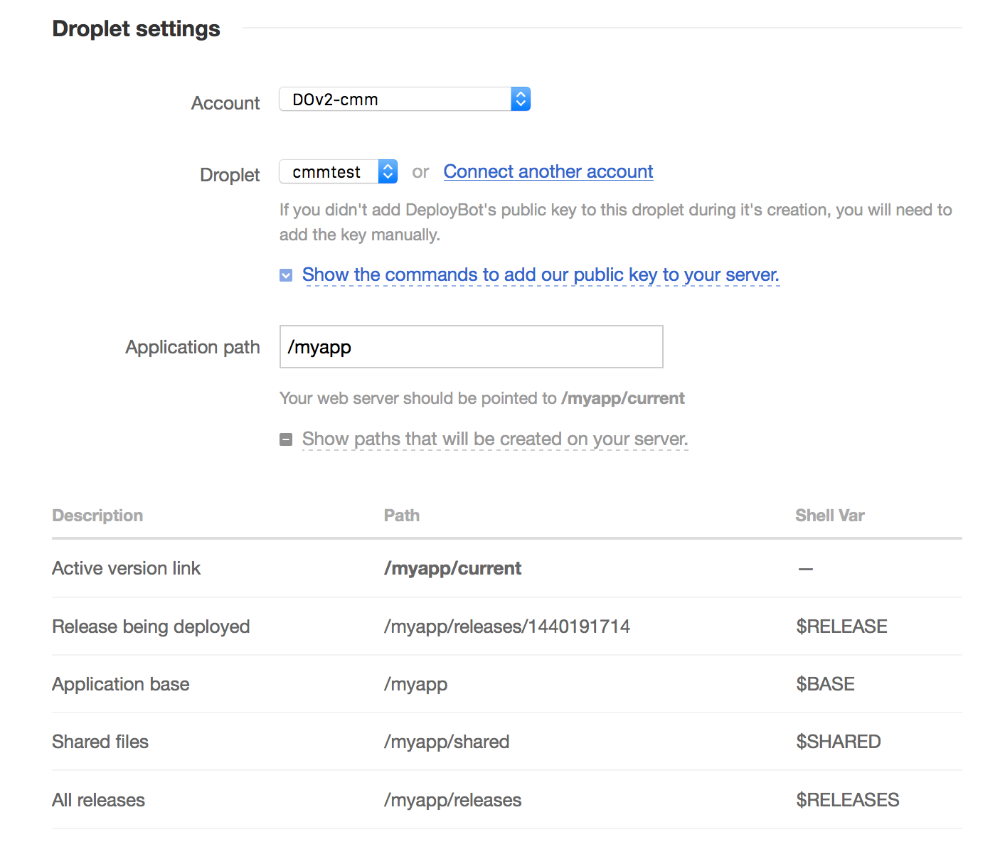
You will need to adjust the target path of your current web application to include the new 'current' directory that DeployBot uses for the deployment.
What happens during an atomic deployment?
When you deploy we update the copy of your code in a cache directory on your server.
When the code is updated, we hardlink that code to a separate release directory.
In the release directory we execute all of the user-defined commands required to get code into shape — like compiling assets or fetching dependencies through bundler or composer.
Once the release is ready, the current symlink is updated to point to a new release directory.
User-defined commands are then executed to restart your application server or related services.
If even one of those steps fail, your current running code is unaffected, as we delay updating the current symlink until the very end of the deployment. Old releases are preserved in case you need to roll back for an emergency, but are cleaned up for you when there are too many of them (this value is configurable in the 'Advanced options' block).
The very last step is to click the 'Save' button at the bottom of the page. You are now ready to deploy to your DigitalOcean droplet!
Non-atomic deployment set up
If you chose the non-atomic deployment, you'll see a screen similar to the one below:
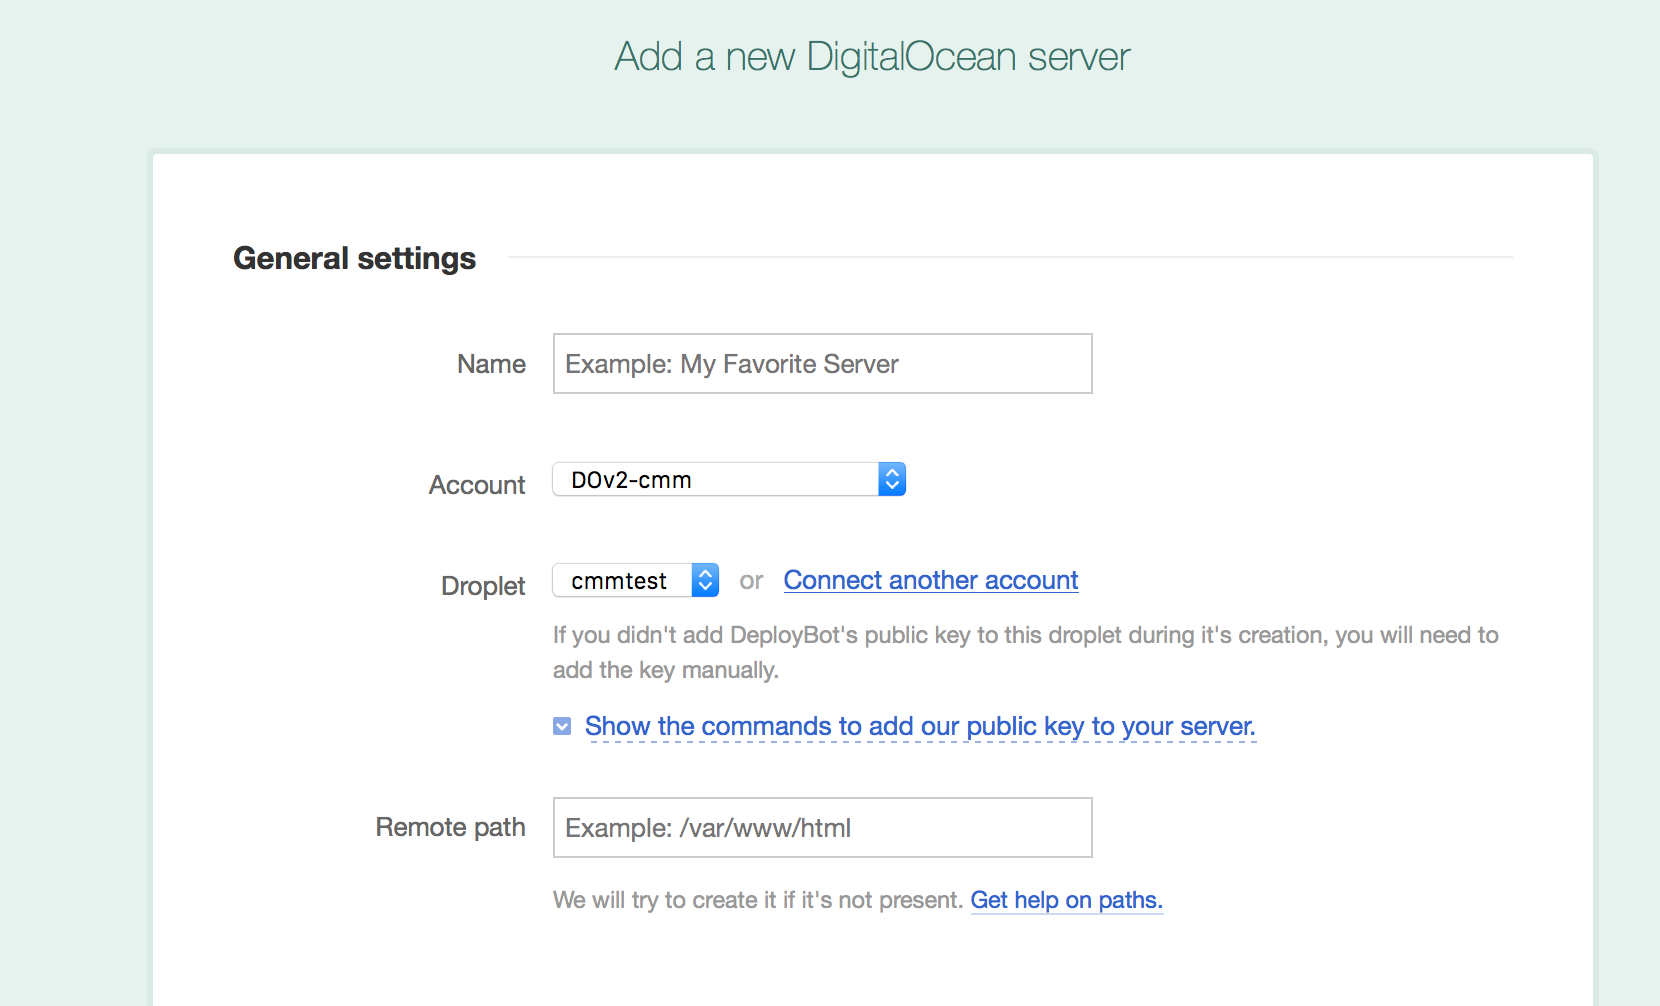
Pick a name for your new server, then select a droplet you want DeployBot to deploy to. The commands to add the DeployBot SSH key to your DigitalOcean droplet are available if you click the “Show the commands to add our public key to your server.” link. You can also specify the remote path for DeployBot to deploy your files.
Enter the path you want DeployBot to deploy your files to in the 'Remote path' section. It is best to use the full path name here, for example: /var/www/html
If you are using a different deployment user or a non-standard SSH port, you can change these under the Advanced options block at the bottom of the page:
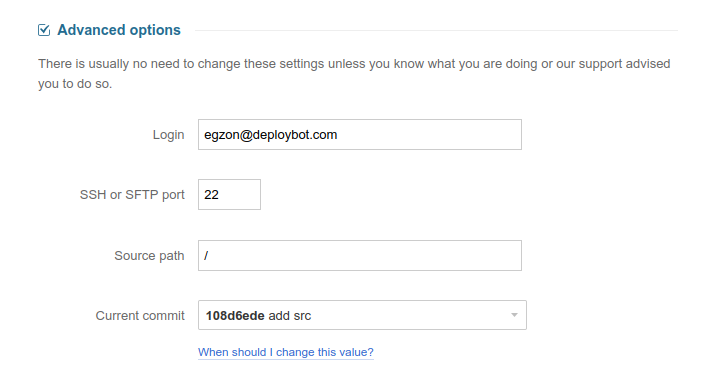
Please note that by default all DigitalOcean droplets are created using only the root user, so DeployBot chooses the root user as the default user for the deployment.
The very last step is to click the 'Save' button at the bottom of the page. You are now ready to deploy to your DigitalOcean droplet!
Troubleshooting SSH connections
The most common connection issues we see come from SSH authentication problems. You can check the following things to resolve the problem:
Make sure that the authorized_keys file is located in home directory of the droplet user you're using for the deployments. Remember that by default the root user is used, so the file should be added to the /home/root/.ssh/ directory. Also check that the permissions on it are set to 0600.
You can set the correct permissions for the file with this command:
chmod 0600 /home/root/.ssh/authorized_keysCheck that the key you downloaded from DeployBot is properly inserted in the authorized_keys file. Each key in the authorized_keys file should be on a separate line, in this format:
ssh-rsa AAAAB3...long-key-here...hUIo6uTLn staging-deployments@deploybot.com ssh-rsa AAAAB3...long-key-here...7bSkeiFdQ production-deployments@deploybot.coIf you are using the root user to deploy, confirm that the user is allowed to use SSH to log in. On Linux, check the 'PermitRootLogin' setting in the /etc/ssh/sshd_config file. If you have a firewall set up, be sure to add the IP addresses from DeployBot. You can find these in our help document.