Deploying static sites to Amazon S3
DeployBot supports deployments to Amazon Simple Storage Service (S3). DeployBot can upload files from your Git repository to your S3 bucket either automatically on every commit or push, or manually.
Deploying to Amazon S3 has some unique uses and advantages. Here are some ways that you can use S3 in your deployment process.
Please note that in order to use S3 deployments you need to have a working Amazon Web Services account.
Deploy website assets to S3
Amazon S3 is a great place to deploy assets, such as images, media, CSS or JavaScript files. Instead of deploying your assets to your web servers directly, you can deploy them to S3 and link to the assets in your site or application. You can also simultaneously deploy your code to your servers and your assets to S3 in one click or action.
Globally distribute files on Amazon CloudFront CDN
If you host your assets or other files on Amazon S3, you also have the option to include this bucket in Amazon's CloudFront service, a globally distributed Content Delivery Network. CloudFront allows you to serve your files across many servers around the world, allowing customers to obtain low latency and high transfer speeds from any location. For instance, if you deploy your site assets on CloudFront, every user accessing your site will be served assets from the closest location, drastically improving response time on your site.
To learn how to setup CloudFront invalidation in DeployBot check our help article.
Host and deploy static HTML
Amazon S3 allows you to easily host static HTML sites, including error pages. If you have simple web sites with HTML, images, and CSS you can deploy your files from DeployBot to an S3 bucket and instantly have a usable site. You can even point your own domain name to the bucket. For complete instructions on setting up static sites with S3, please read their documentation.
Note: We require the following permissions for S3:
- s3:ListAllMyBuckets
- s3:ListBucket
- s3:GetBucketLocation
- s3:GetObjectAcl
- s3:DeleteObject
- s3:PutObjectAcl
- s3:PutObject
Getting started
When you create a new Environment in the Deployments section you will be presented with a list of available server types that you can add to the environment:
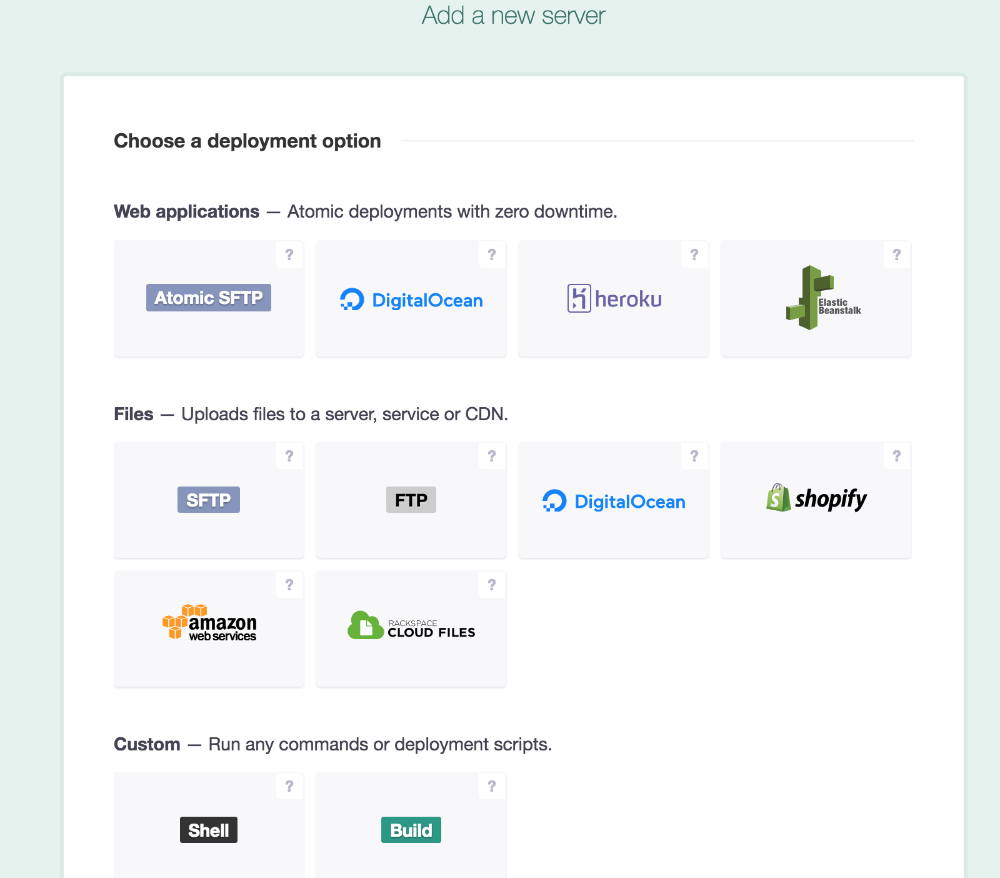
You can add multiple servers to the same environment, enabling you to deploy to various server types at once. For example, you may have both an SFTP and an Amazon S3 server in your Production environment. This way you can deploy static assets to Amazon S3, and everything else to your SFTP server.
After selecting the Amazon S3 server type, you will be presented with the following form to enter your S3 settings:
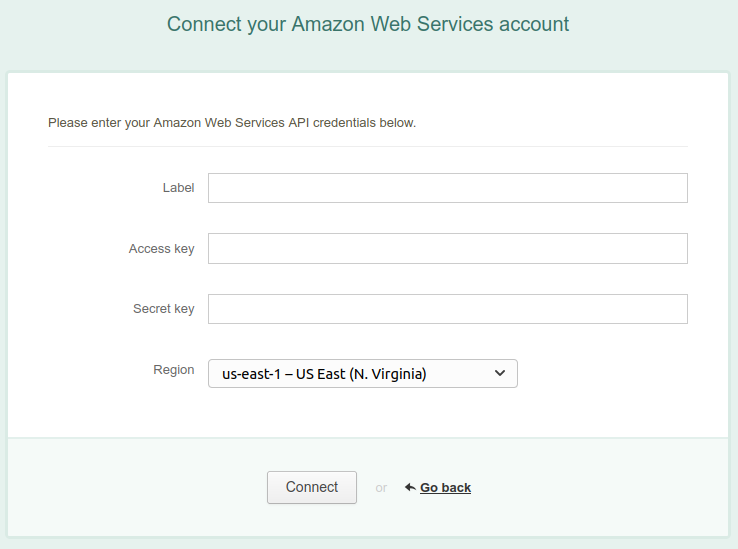
The form is quite straightforward. Here's a description of some of the fields:
- Access Key, Secret Key — you can grab your keys on the Security & Credentials page in your Amazon Web Services account portal.
- Bucket — the name of a valid existing bucket. If you don't have any buckets yet, log in to the S3 console and create one.
- Remote path — points to a directory inside your bucket where you wish to deploy files from your repository.
- Use Reduced Redundancy Storage — optional setting. Read our help article on that matter.
Once you're done with the form and click Check Connection, DeployBot will verify your AWS keys and make sure that your bucket exists. After that, you will be presented with the optional settings and ability to turn on CloudFront Invalidation.